The proximity sensor, built with Arduino... senses proximity? 🫣 Hehe, well yeah, it is a distance-measuring module. Along with distance-measurement, I also added the feature of an LED blinking and a buzzer beeping if the distance gets too close. That way, I also used many components and addition of these two features was a real upgrade to my coding skills, as I shall share it in the below section.
Watch the working demo of the Proximity Sensor below:
The entire code for the project can be accessed in the GitHub Repo above.
How I built It (the code)
The code was written, entirely in C++ of Arduino (with its own functions, and stuff for the components).
The first part (version) was the simplest one. All I had to do was calculate the distance, and display it in the LCD. The ultrasonic sensor sends out pulses, and measures the time it took for it to receive it back after echoing. Using this time, I could calculate the distance using the speed-distance formula. The formula for speed is: $$\text{Speed}=\frac{\text{Distance}}{\text{Time}}$$
So, $$\text{Distance}=\text{Speed}\times \text{Time} $$
Since the pulse has to travel twice the distance (first traveling once, then twice to come back after echo),
$$\text{Distance}\times 2=\text{Speed}\times \text{Time}$$
$$\text{Distance}=\frac{\text{Speed}\times \text{Time}}{2} $$
And voila! That's the equation I used to calculate the distance.
I used the speed of sound, at room temperature, to be $343ms^{-1}$, and the time it took was obtained using the ultrasonic sensor's reading, given by this part of the code:
Okay, well, this was the heart of the whole project. But I wanted to make it even better - so I added a blinking LED and a beeping buzzer. This was the most tricky part. This is so, because there are two ways to delay the beeping or blinking. 1. Use the built in delay function, 2. Use timestamps to turn the LED (or buzzer) on or off.
The issue with the first one is that, if I use the same, then the whole code freezes. Say, I pause the code for 2 seconds, to turn the LED off and then turn it on again. That way, the whole code freezes - meaning, if I move the sensor to a different position during that time interval, then the distance will not get updated until the delay interval has passed (2 seconds, here).
Therefore, I had to use the timestamp method, where I start a timer (say timer_1) in the beginning, and then keeping measuring the current time (timer_2), and when the difference between the current time and the initial time passed is greater or equal to the time interval, then the LED or buzzer is toggled. This timer can be initialized in Arduino using the built-in millis() function.
The code for the same, (which is actually the longest part) is as below:
I have started the initial timers for the LED (and buzzer) in the beginning, with this code:
unsigned long previousMillisLED = 0;
unsigned long previousMillisLCD = 0;
I have used two such timers here, one for the LCD and LED. I have done so, because while the frequency of the LED blinking may change, the frequency of the blinking 'CLOSE' on the LCD is constant.
// LED BLINKING
  long intervalLED = 50 + (distance * 10); // Contains the interval, which changes with the distance

  if (distance <= 30 && distance > 5) {
    unsigned long currentMillis = millis(); // The second timer, whose value is subtracted from the original timer

    if (currentMillis - previousMillisLED >= intervalLED) {  // If the above result is greater than the interval (frequency) the below code runs:
      previousMillisLED = currentMillis; // resets the value of the original timer to the new timer's value, so the next time it runs, it essentially is just reset to 0, relative to the second timer

      ledState = !ledState; // Toggles the LED (and the buzzer, since in the same circuit)
      digitalWrite(LED, ledState); // On -> Off, Off-> On
    }
  }
  else if (distance <= 5) {
    digitalWrite(LED, HIGH); // If distance is less than 5cm, the LED STAYS ON
  }
  else {
    digitalWrite(LED, LOW); // If neither of the above conditions is true, then the LED stays off, obviously
  }
The third part follows from a concept similar to that of the blinking LED. This part deals with the flashing "CLOSE" on the LCD, and the constant "TOO CLOSE!!" for when the distance is less than 5cm. The code for the same is below:
bool show_text = true;
.
.

// Row 1 → Status
  if (distance < 30 && distance > 5) {
    unsigned long currentMillis = millis(); // initializes a timer for the LCD
    display.setCursor(0, 1); // Moves the cursor to the second line

    if (currentMillis - previousMillisLCD >= 500) { // The interval here has been chosen to be 500ms, so the blinking takes place every 500ms
      previousMillisLCD = currentMillis;
      show_text = !show_text; // Flips the value of _show_text_ which is at the beginning.

      if (show_text) {
        display.print("     CLOSE      ");   // text
      } else {
        display.print("           "); // blank
      }

      // The above if-else statements control the alternate printing of the text needed "CLOSE" and blank space, essentially creating the effect of flashing "CLOSE"
    }

  }
  else if (distance <= 5) {
    display.setCursor(2, 1);
    display.print("TOO CLOSE!!   "); // "TOO CLOSE!!" stays printed (i.e., no blinking)
  }
  else {
    display.setCursor(0, 1);
    display.print("                "); // clear row
  }
The rest of the code deals with boilerplate code for initialization of the components and their set-ups, mostly. The last delay(10) has been added to give some space between two readings, for the LCD distance to be actually readable. Else, it would be changing rapidly.
Another thing I would like to point out is a doubt I had myself: What would happen if no echo is received? For example, pointing the sensor towards the sky. Then, unless there's some obstacle, there's no way the wave could come back.
This is where the pulseIn(ECHO, HIGH, 100000) comes in—especially the last parameter (100000). This value represents the timeout in microseconds (i.e., 0.1 seconds). If no echo is received within this time, the function stops waiting and returns control to the loop.
This prevents the program from getting stuck indefinitely waiting for a signal that may never arrive, and allows the Arduino to trigger a new pulse in the next cycle.
What I learned
Throughout the building of this project, I learned:
First thing, of course, using the ultrasonic sensor, and LCD components for Arduino. Even though each part has its own library, using libraries is straightforward, but understanding how to integrate them effectively was valuable
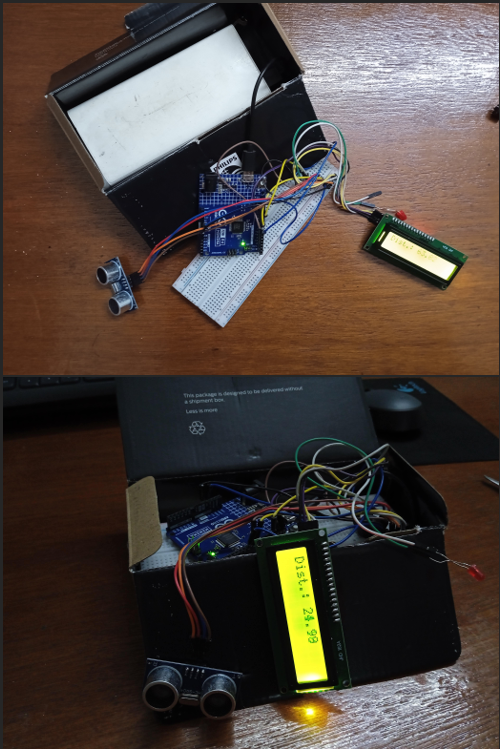
Assembling the raw, messy circuits into a polished (or at least somewhat close) module, which is presentable and actually usable. Here's how the mere circuit looked:
Image of Arduino Circuit
There wasn't anything to be learnt but now I know that one could use power banks to power the Arduino too 🤓. I first used a 9V battery for it (the cuboidal one) but then the stupid battery wasn't able to supply enough current to the module to power it, so the LCD started flickering. The power bank proved to be the best for the purpose (at least then).
Most importantly, I learned using millis() as far-better substitutes for delay(). Though the logic is simple, I, at first, struggled with it. But then I became familiar with it so there's no chance I'm forgetting it now 🔥.
Both the coding and circuit-building parts were equally interesting and joyful for me.
Review & Reflect
Looking back at this project, I’d say it was one of those builds where things seemed simple at first… but got surprisingly deep as I went along. The basic idea—measure distance and display it—was straightforward. But once I started adding features like the LED and buzzer, I realized how important how you write the code really is, not just what it does.
The biggest shift for me was moving from using delay() to millis(). Initially, I underestimated how much of a difference that would make. But once I saw how smooth and responsive the system became without freezing, it genuinely felt like a level-up moment in my coding journey.
There were also small but real-world lessons—like power supply issues. I didn’t expect something like a 9V battery to fail so badly, but that taught me that practical electronics isn’t just about wiring things correctly; it’s also about understanding limitations and making smarter choices.
If I had to improve this project further, I’d probably try adding more features like variable buzzer tones based on distance, or even plotting the distance data over time. Maybe even turn it into a more compact, enclosed module instead of a visible circuit.
Overall, this project was genuinely fun to build. It wasn’t just about getting an output—it was about understanding the system, debugging issues, and improving step by step. And honestly, that’s what made it satisfying.
Definitely one of those projects where I didn’t just build something—I actually learned something that I know I’ll reuse in the future.